Best DVD Ripper and DVD Converter to rip DVD to iPad, convert DVD and video to the popular video and audio formats. Pop Searches: best Blu-ray ripper, rip DVD, DVD Maker , DVD software, Copy DVD


How to Rip DVD to MP4, AVI, MP3, WMV, RM, 3GP, etc video?
With the development of technology, more and more multiple players have sprung into our life, such as, iPod, iPhone, PSP, PS3, Zune, which are all the leaders of portable devices. However, any one of them could play DVD movie directly. How to make DVD disc movie playable on these devices? DVD Ripper provides the best solution to rip DVD to iPad, iPod, PSP on Windows and Mac.
The following guide shows you how to rip DVD to MP4, AVI, MP3, WMV, WMA, FLV, MKV, MPG, RM, 3GP, etc by using 4videosoft DVD Ripper.
Step 1: Install and run 4videosoft DVD Ripper
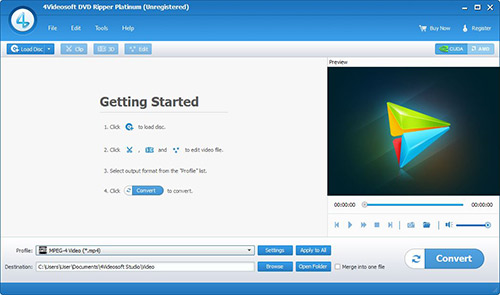
Step 2: Load DVD Files
Insert the DVD disc into your DVD drive and click the "Load DVD" button to load DVD.
Tips: This DVD Ripper can load three DVD source, you can load your DVD from DVD drive, DVD folder in your PC and also IFO file.
Step 3: Output Settings
Select the output video format you need from the "Profile" drop-down list.
Tips:
1: You can also select Audio Track and Subtitle from their respectively drop-down list.
2: The " Snapshot" opinion gives you access to take snapshot of your like scene and save it in image form while you preview video. And you can click the "File" next to "Snapshot" button to open your picture. You can select the destination of the picture by clicking the "Preference" button. As default the captured image will be saved at: C:\Documents and Settings\Administrator\My Documents\4videosoft Studio\Snapshot
3: If you want to merge the selected contents into one file you can check the "merge into one file" option. As default the merged file is named after the first selected file (either a title or a chapter)
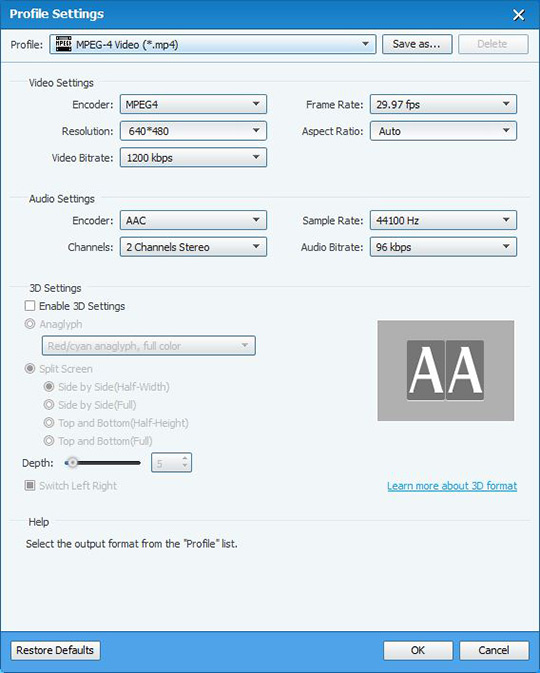
4: You can click the "Settings" button to set your video parameters.
In the Video Settings, you can select Encoder, Frame Rate, Resolution and Bitrate for your movie.
In the Audio Settings, you can select Encoder, Channels, Bitrate and Sample Rate for your movie.
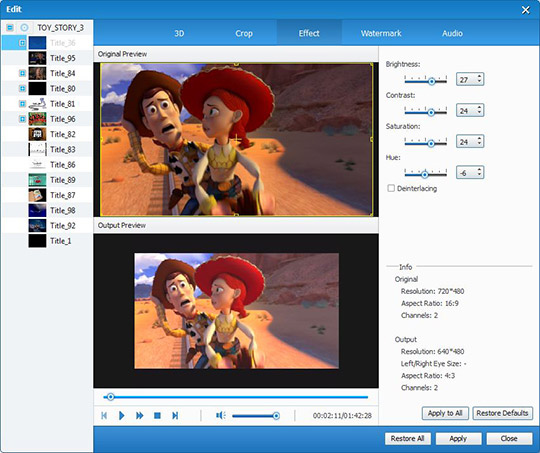
Step 4: Edit Video Effects
Note: This step is optional, you can choose to customize video effects at will or save its original effects just by skipping this steps.
1. Movie Effect
If you want to change the original video effect, you can click the "Effect" icon to set the video brightness, contrast, saturation, etc. You can also set the special effect for your movie according to your need.
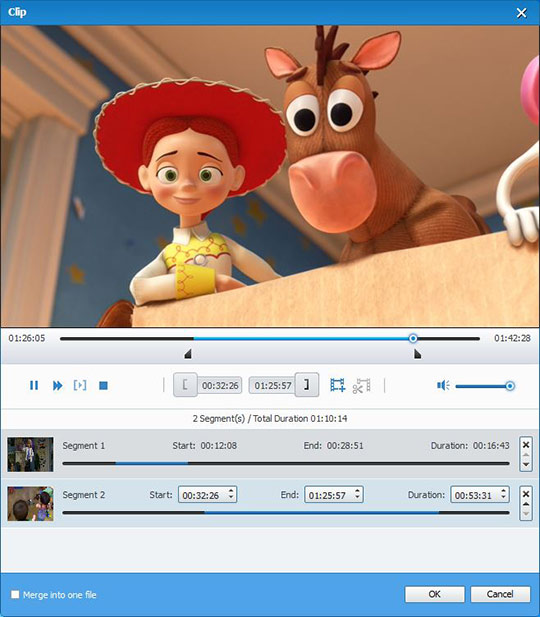
2. Clip Movie
"Trim" function is designed to help users to convert a clip from a DVD movie. Click "Clip" button to open the Clip dialog, you can trim a duration of the selected title or chapter by dragging the Start Time and End Time sliders or setting the time parameters in each corresponding field.
3. Video Crop
With this DVD to Video Ripper, you can remove the unwanted edges around your video by checking the "Crop" option, so you can watch your movie on your portable players in full screen.
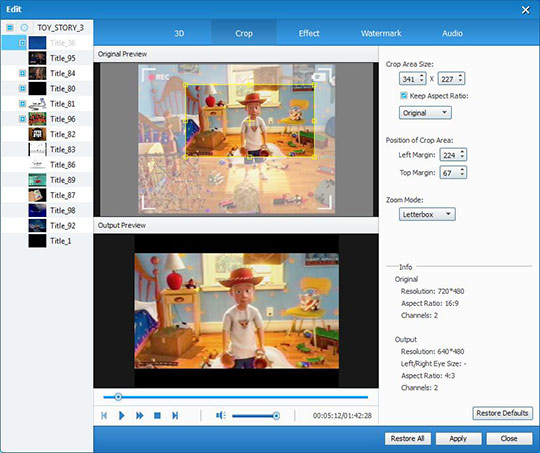
Before you start to crop your movie video, you can select an output aspect ratio from the Zoom list. There are four choices available: Full screen, Keep original, 16:9 and 4:3. After you select an output aspect ratio and finish the crop, the result can be previewed in the Preview window of the main interface.
4. Video Watermark
You can add watermarks in the form of "text" or "image" on video. And you can define its size, color, position and transparency freely.

Step 5: Start to Convert
Click the "Start" button to start your conversion and in a short while it will be finished.
The conversion process will finish in a few minutes and you can click "Open" button to open your output destination file.
For Mac users, 4videosoft DVD Ripper for Mac is a nice choice. It's an ideal DVD Converting software for Mac users. Free download and try it yourself.